Wednesday, September 30, 2020

Chaining Common Table Expressions in Impala

This article will help you to learn how to implement chaining common table expressions in Cloudera's Impala.

-~ Chaining CTEs

WITH
Temp1 AS (
         SELECT OrderID,
                         OrderStatus,
                         ProductID
          FROM temp2
          WHERE order_status = 'completed'
),
Temp2 AS (
          SELECT OrderID,
                          OrderStatus,
                          ProductID
          FROM Orders
          WHERE ProductID = 5
)
SELECT * FROM (SELECT COUNT(1) FROM Temp1) a;

Technically the query doesn't make any sense, it can be written in a straight-forward and in a simple way -

SELECT COUNT(1)
FROM Orders
WHERE ProductID = 5
AND order_status='completed'  

However, observe the structure or the pattern. In order to execute the first common table expression, it needs the values from the second expression. 

Get the unique values from multiple CTEs - Impala

Often, some requests for reports seem simple and straightforward. But it is challenging to find a better solution to be applied. Cloudera's Impala provides several features, and in order to accomplish the tasks in the best possible way, an analyst needs to be aware of them. 

Assume that, after filtering out specific values, there are two separate result sets that need to be combined into a single output with distinct values. How would you do that?

Let's see with an example.

Below are two sample datasets:


Now the requirement is -
i) Get the products that cost over 500 AED from "DXB_Products" table  
ii) Get the products from SHJ_Products that cost less than 500 AED.
iii) Now combine both the resultsets and filter-out unique products.

Common table expression is the best way to get the desired output. Here's the query -

WITH CTE1 AS (
           SELECT * FROM DXB_Products WHERE Price > 500
                            ),
           CTE2 AS (
           SELECT * FROM SHJ_Products WHERE Price > 500
                           )
SELECT * FROM CTE1 UNION SELECT * FROM CTE2;


Hope you find this article useful.

Starting Hive & Hive metastore from command line

The following commands will help in starting the services of Hive and Hive metastore in case they didn't start automatically without logging into Cloudera manager. 

sudo service hive-metastore start 


sudo service hive-server2 start


Do let me know if you are facing any issues.


Split equivalent in Impala

Split function splits the data based on the delimiter provided and it is mostly used function in Apache Hive. This function is not available in Impala. However, there is an alternative to it.

Let us first see the usage of the "split" function in Hive.

Below is the patient's blood pressure variations information.

TableName: PatientsData
Systolic-Diastolic
122/80, 122/83, 130/83, 135/86, 140/95, 147/92

SELECT split(data,'\/') as split_data from PatientsData;

Result:
split_data
122,80
122,83
130,83
130,83
135,86
140,95
147,92

SELECT split(data,'\/')[0] AS Systolic, 
               split(data,'\/')[1] AS Diastolic 
FROM PatientsData;

Result:
Systolic   Diastolic
122          80
122          83
130          83
130          83
135          86
140          95
147          92


Let's do the same exercise in Impala using "split_part" function.

SELECT split_part(data,'\/',1) AS Systolic, 
               split_part(data,'\/',2) AS Diastolic 
FROM PatientsData;

Result:
Systolic   Diastolic
122          80
122          83
130          83
130          83
135          86
140          95
147          92

As per the documentation from Apache, below is the description of the function.

SPLIT_PART(STRING source, STRING delimiter, BIGINT index)

Purpose: Returns the requested indexth part of the input source string split by the delimiter.

If the index is a positive number, returns the indexth part from the left within the source string. If the index is a negative number, returns the indexth part from the right within the source string. If the index is 0, returns an error.

The delimiter can consist of multiple characters, not just a single character.

All matching of the delimiter is done exactly, not using any regular expression patterns.

Return type: STRING


Joins in HiveQL

    As we discussed earlier, HiveQL handles structured data only, much like SQL. This doesn't mean that Hive just manages structured data, it also processes and transforms the unstructured data into a readable structured way. 

    Unstructured data is usually not dependent on static data or other data files. But in structured data, especially if the data is imported from relational systems, due to normalization, the tables may be connected with other tables to obtain meaningful information for a few columns. Hence functionalities of SQL will also be needed in big-data platforms such as Joins, Sub-queries, casting, and conversion functions.

    This article focuses on the joins that are available in Hive.

    Below is the type of joins available in Hive.

    • INNER JOIN

    • LEFT OUTER JOIN

    • RIGHT OUTER JOIN

    • FULL OUTER JOIN

    I am not specifying "self-join" explicitly because it is also an inner join. 

    INNER JOIN is the join type that combines two tables to return records that have matching values from both the tables.

    LEFT OUTER JOIN returns all records from the left table and the matched records from the right table.

    RIGHT OUTER JOIN is a join that returns all records from the right table, and the matched records from the left table.

    FULL OUTER JOIN displays all the records i.e. matched records and unmatched records from both the tables. 

    Not just the description but the implementation is also as same as in SQL.

    Please do let me know if you want to see how it is to be implemented in Hive.


    Can we create a table based on a view in HIve?

    Can we create a table based on a view in Hive?

    Yes, we can.!!

    Let's create "View" by combining Emp and Dept tables.

    -~ To create a view

    CREATE VIEW Emp_View
    AS
    SELECT Ename, DName FROM Emp
    INNER JOIN Dept ON Emp.DeptNo = Dept.DeptNo;

    Now let's create the table based on the view.

    CREATE TABLE EmpDept
    AS
    SELECT * FROM Emp_View;


    Creating a table and a view with the select statement.

    In this article, you'll learn how to create a view and table based on a select statement.


    -~ To create a view

    CREATE VIEW Emp_View 
    AS
    SELECT Ename, DName FROM Emp
    INNER JOIN Dept ON Emp.DeptNo = Dept.DeptNo;


    -~ To create a table

    CREATE TABLE EmpDept 
    AS 
    SELECT Ename, DName FROM Emp
    INNER JOIN Dept ON Emp.DeptNo = Dept.DeptNo;


    Can we create a table based on a view? Click here.


    Hive - Extended Properties

    In this article, you will learn how to list out the properties of a database or a table in Hive.

    DATABASE LEVEL:

    DESCRIBE DATABASE db_name;
    DESCRIBE SCHEMA db_name;

    Database or schema both are the same thing. These words can be used interchangeably.

    DESCRIBE DATABASE EXTENDED db_name;
    Use the above command to list all the database properties attached to a particular database in Hive.


    TABLE LEVEL:

    DESC TableName
    DESCRIBE TableName
    Use the above command to get the schema of the table.

    DESC EXTENDED TableName
    Use the above command to get detailed information about the table that includes comments, last modified date, etc along with the table's definition.

    DESC FORMATTED TableName
    Use the above command to get the summary, details, and formatted information about the specified table.


    Hive Table Properties

    The TBLPROPERTIES clause enables you to use your own metadata key/value pairs to tag the table definition.

    There are also several predefined table properties, such as last-modified-user and last-modified-time, which Hive automatically adds and manages. 

    To view the properties of a table use the below command in hive prompt.

    SHOW TBLPROPERTIES tblname;

    This lists all the properties of the table. 

    If the table's input format is ORC (refer to the input file formats) then you'll see which compression (snappy or zlib) has opted. You'll see if the transactional property set to true or false. You'll also see the predefined table properties that managed by Hive.


    Word Count in HiveQL - Explode and Split Usage

    This article aims to explain the usage of the SPLIT function in HiveQL. If you are looking for a similar function in SQL Server, then please click here.


    Let's create a staging table to load the data temporarily.
    CREATE TABLE tempData (col1 STRING);

    Load the data to the table.
    LOAD DATA INPATH 'Desktop/DataFile' OVERWRITE INTO TABLE tempData;

    To split the data from the above-created temp table 
    SELECT word, count(1) AS count FROM
    (SELECT explode(split(col1, '\s')) AS word FROM tempData) temp
    GROUP BY word
    ORDER BY word;

    Split function splits the data based on the delimiter provided. The Explode function will further split the data into smaller chunks. Let's see what these explode and split functions are doing with another example.

    Below is the patient's blood pressure variations information.

    TableName: PatientsData
    Systolic-Diastolic
    122/80, 122/83, 130/83, 135/86, 140/95, 147/92

    SELECT split(data,'\/') as split_data from PatientsData;

    Result:
    split_data
    122,80
    122,83
    130,83
    130,83
    135,86
    140,95
    147,92

    SELECT split(data,'\/')[0] AS Systolic, split(data,'\/')[1] AS Diastolic from PatientsData;

    Result:
    Systolic   Diastolic
    122          80
    122          83
    130          83
    130          83
    135          86
    140          95
    147          92

    SELECT explode(split(data,'\/')) as exploded_data from PatientsData;

    Result:
    exploded_data
    122
    80
    122
    83
    130
    83
    130
    83
    135
    86
    140
    95
    147
    92

    Hope you understood the behavior of the function with the examples.

    If you are looking for a word-count program using SQL Server, then click here.
    If you are looking for a word-count program using Pig, then click here.


    Tuesday, September 29, 2020

    File formats and compression in Apache Hive

    The purpose of this article is to address the different file formats and compression codecs in Apache Hive that are available for different data sets. We will also explore how to use them properly and when to use them.

    HiveQL handles structured data only, much like SQL. In order to store the data in it, Hive has a derby database by default. The data will be stored as files in the backend framework while it shows the data in a structured format when it is retrieved. Some special file formats that Hive can handle are available, such as:

    • Text File Format

    • Sequence File Format

    • RCFile (Row column file format)

    • Avro Files

    • ORC Files (Optimized Row Columnar file format)

    • Parquet

    • Custom INPUTFORMAT and OUTPUTFORMAT


    1) TEXT FILE FORMAT:
     
    Hive Text file format is a default storage format to load data from comma-separated values (CSV), tab-delimited, space-delimited, or text files that delimited by other special characters. You can use the text format to interchange the data with other client applications. The text file format is very common for most of the applications. Data is stored in lines, with each line being a record. Each line is terminated by a newline character (\n). 

    The text file format storage option is defined by specifying "STORED AS TEXTFILE" at the end of the table creation.

    2) SEQUENCE FILE FORMAT: 

    Flat files consisting of binary key-value pairs are sequence files. When converting queries to MapReduce jobs, Hive chooses to use the necessary key-value pairs for a given record. The key advantages of using a sequence file are that it incorporates two or more files into one file.

    The sequence file format storage option is defined by specifying  "STORED AS SEQUENCEFILE" at the end of the table creation.

    3) RCFILE FORMAT:

    The row columnar file format is very much similar to the sequence file format. It is a data placement structure designed for MapReduce-based data warehouse systems. This also stores the data as key-value pairs and offers a high row-level compression rate. This will be used when there is a requirement to perform multiple rows at a time. RCFile format is supported by Hive version 0.6.0 and later.

    The RC file format storage option is defined by specifying "STORED AS RCFILE" at the end of the table creation.

    4) AVRO FILE FORMAT:

    Hive version 0.14.0 and later versions support Avro files. It is a row-based storage format for Hadoop which is widely used as a serialization platform. It's a remote procedure call and data serialization framework that uses JSON for defining data types and protocols and serializes data in a compact binary format to make it compact and efficient. This file format can be used in any of the Hadoop’s tools like Pig and Hive.

    Avro is one of the common file formats in applications based on Hadoop. The option to store the data in the RC file format is defined by specifying "STORED AS AVRO" at the end of the table creation.

    5) ORC FILE FORMAT:

    The Optimized Row Columnar (ORC) file format provides a highly efficient way to store data in the Hive table. This file system was actually designed to overcome limitations of the other Hive file formats. ORC reduces I/O overhead by accessing only the columns that are required for the current query. It requires significantly fewer seek operations because all columns within a single group of row data are stored together on disk.

    The ORC file format storage option is defined by specifying "STORED AS ORC" at the end of the table creation.

    6) PARQUET:

    Parquet is a binary file format that is column driven. It is an open-source available to any project in the Hadoop ecosystem and is designed for data storage in an effective and efficient flat columnar format compared to row-based files such as CSV or TSV files. It only reads the necessary columns, which significantly reduces the IO and thus makes it highly efficient for large-scale query types. The Parquet table uses Snappy, which is a fast data compression and decompression library, as the default compression.

    The parquet file format storage option is defined by specifying "STORED AS PARQUET" at the end of the table creation.

    7) CUSTOMER INPUTFORMAT & OUTPUTFORMAT:

    We can implement our own "inputformat" and "outputformat" incase the data comes in a different format. These "inputformat" and "outputformat" is similar to Hadoop MapReduce's input and output formats. 

    In upcoming posts, we will explore more with examples for each and every file format. 

    Have a nice day..!!


    Commonly used Apache Hive non-SQL Statements

    Commands are non-SQL statements such as setting a property or adding a resource. They can be used in HiveQL scripts or directly in the CLI or Beeline. The below commands are mostly used ones and are helpful while working with partitions, adding external jar files, and changing the configuration settings.


    Show column names in the result:
    SET hive.cli.print.header=true;

    Show database name in the Hive prompt:
    SET hive.cli.print.current.db=true;

    Display only the column names and exclude the table name in the resultset.
    SET hive.resultset.use.unique.column.names=false;

    Set property while using with Static Partitions:
    SET hive.mapred.mode=strict;

    Set property while using Dynamic Partitions:
    SET hive.exec.dynamic.partition=true;
    SET hive.exec.dynamic.partition.mode=nonstrict;

    While working with buckets, enable the property by using the following command.
    SET hive.enforce.bucketing=true;

    Set properties while using bucket-map-join and sorted merge.
    SET hive.enforce.sortmergebucketmapjoin=false;
    SET hive.auto.convert.sortmerge.join=false;
    SET hive.optimize.bucketmapjoin=true;
    SET hive.optimize.bucketmapjoin.sortedmerge=true;


    Do let me know if you need any clarification on any of the property mentioned above.


    HDFS Basic Commands

    This article will explore some Hadoop basic commands that help in our day-to-day activities.

    Hadoop file system shell commands are organized in a similar way to Unix/Linux environments. For people who work with Unix shell, it is easy to turn to Hadoop shell commands. Such commands communicate with HDFS and other Hadoop-supported file systems.

    1) List-out the contents of the directory.

    ls
    is to list out the files from the current directory (local system)

    hadoop fs -ls
    will list HDFS home directory (/user/cloudera/) content of the current user

    hadoop fs -ls /
    will list sub-directories of the root directory.

    hdfs dfs -ls
    will list the contents of the root directory.

    Note: Use hadoop fs for older versions and hdfs dfs for newer versions of Hadoop. 

    hadoop fs -ls /user/cloudera
    /user/cloudera is default HDFS location in Cloudera VM where users files get copied.

    hadoop fs -ls -R / 
    recursively displays entries in all subdirectories of a path

    2) Create or delete a directory

    hadoop fs –mkdir /path/directory_name
    mkdir is the command to create a folder/directory in a given path. 

    Example:
    hadoop fs -mkdir testdir1
    hadoop fs –mkdir /user/cloudera/testdir2

    hadoop fs -rm -r /user/cloudera/testdir2
    -rm -r is the command to delete a folder/directory or a specific file.

    Example:
    hadoop fs -rm -r /user/cloudera/testdir2
    hadoop fs -rmr /user/cloudera/testdir2/file1.txt

    Note: If the OS is in safemode then you’ll not be able to create any directories in HDFS.

    To check the status of safemode
    hadoop dfsadmin -safemode get

    To change the safemode to ON
    hadoop dfsadmin -safemode enter

    To change the safemode to OFF / or to leave the safemode

    hadoop dfsadmin -safemode leave


    3) Copy The File From Local System To Hadoop

    hadoop fs -put <sourcefilepath> <destinationfilepath>

    Examples:

    hadoop fs -put Desktop/Documents/emp.txt /user/cloudera/empdir

    hadoop fs -copyFromLocal Desktop/Documents/emp.txt /user/cloudera/emp.txt

    To know more about "copyFromLocal", "put" "copyToLocal" and "get", please click here.  

    4) Read the file

    hadoop fs -cat /user/cloudera/emp.txt

    The above command helps in reading the file however, one has to avoid using this command for large files since it can impact on I/O. This command is good for files with small data.

    5) Copy the file from HDFS to Local System

    hadoop fs -get /user/cloudera/emp.txt Desktop/Documents/emp1.txt
    hadoop fs -copyToLocal /user/cloudera/emp.txt Desktop/Documents/emp2.txt

    This is reverse scenario of Put & CopyFromLocal. For more information click here.


    6) Move the file from one HDFS location to another (HDFS location)

    Hadoop fs -mv emp.txt testDir

    Hadoop fs -mv testDir tesDir2

    Hadoop fs -mv testDir2/testDir /user/cloudera

    Hadoop fs -mv testDir/emp.txt /user/cloudera

    7) Admin Commands

    sudo vi /etc/hadoop/conf/hdfs-site.xml 
    Note: hdfs-site.xml is a configuration file where we can change.

    To view the config settings
    go to --> computer-browse folder-filesystem-->etc-->hadoop-->conf-->hdfs-site.xml

    To change the default configuration values such as dfs.replication or dfs.blocksize from hdfs-site.xml, use the sudo commands

    sudo vi /etc/hadoop/conf/hdfs-site.xml
    Note: "vi" is the editor to edit such sudo files.

    Click "I" for insert option or to bring it in edit mode.

    Modify the values as per your requirement.

    To save and exit :wq!

    hadoop fs -tail [-f] <file>

    The Hadoop fs shell tail command shows the last 1KB of a file on console or stdout.


    File exists error in HDFS - CopyFromLocal

    HDFS is a distributed file system designed to run on top of the local file system. Many times we may need to copy files from different sources i.e. from the internet, remote network, or from the local file system. There are  "CopyFromLocal" and "Put" commands to help us in performing the task. While copying a file from the local file system to HDFS, if the file exists in the destination, the execution will fail and we will receive 'the file exists' error.

    Let's assume the file "emp.txt" already exists in the path /user/cloudera.

    Hadoop fs -put Desktop/emp.txt /user/cloudera/emp.txt

    This returned “the file already exists” error

    Hadoop fs -copyFromLocal Desktop/emp.txt /user/cloudera/emp.txt

    This also returned “the file already exists” error.

    Hadoop fs -copyFromLocal -f Desktop/Documents/emp.txt /user/cloudera/emp.txt
    This is succeeded. The file is copied to the destination without any errors.

    The usage of the "-f" option with -copyFromLocal will overwrite the destination if it already exists.


    Hope you find this article helpful.

    Monday, September 28, 2020

    Difference between CopyFromLocal, Put, CopyToLocal and Get

    The purpose of this article is to let you know about few HDFS commands that are identical in behavior but distinct.


    CopyFromLocal and Put: These two commands help in copying the file from one location to another. The difference between these two is that the "CopyFromLocal" command will help copy the file from local file system to HDFS, while the "Put" command will copy from anywhere (local or network) to anywhere (HDFS or local file system).

    hadoop fs -put <Local system directory path or network path> <HDFS file path>

    hadoop fs -copyFromLocal <Local system directory path>  <HDFS file path>

    "Put" allows us to copy several file paths to HDFS at once (files or folders from 
    local or remote locations), while copyFromLocal, on the other hand, is limited to local file reference.

    A choice exists to overwrite an existing file using -f when using copyFromLocal. However, an error is returned if the file persists when "put" is executed.

    In short, anything you do with copyFromLocal, you can do with "put", but not vice-versa.

    CopyToLocal and Get: These two commands are just opposite to "CopyFromLocal" and "Put".
    The destination is restricted to a local file reference when we use copyToLocal. While using "Get" there are no such restrictions.

    Anything you do with copyToLocal, you can do with "get" but not vice-versa.
    hadoop fs -get <HDFS file path> <Local system directory path> hadoop fs -copyToLocal <HDFS file path> <Local system directory path>

    For complete HDFS commands please click here. For complete Hive DDL commands please click here.

    An alternative to ISNULL() and NVL() functions in Hive

    The NVL() function enables you to substitute null for a more relevant alternative in the query results. This function accepts two arguments. If the first argument is null, then it returns the second argument. If the first argument is not null, it returns the first one and will ignore the second argument. This function is available in Oracle SQL*Plus, but not in MySQL, SQL Server, and Hive.

    However, as an alternative, ISNULL() and COALESCE() functions can be used to achieve the same result in MySQL and SQL Server. Since ISNULL() is not available in Hive, COALESCE() function is the only option to achieve the desired output.

    The difference between NVL() and COALESCE() is that COALESCE() will return the first non-null value from the list of expressions while NVL() only takes two parameters and returns the first if it is not null, otherwise, returns the second.

    Let's see what these three functions will do.

    Oracle:
    SELECT first_name + middle_name + last_name As EmpName
    FROM Employees;

    Result:

    Employees
    ---------------------------
    Robert Finn Hill
    Bruce M. Wills
    Maria Andrew Brown
    NULL

    The last row is null because there is no middle name of the employee. NULL is returned when concatenated the null with first-name and last-name. There we use NVL() function. 

    SELECT first_name + NVL(middle_name, ' ') + last_name As EmpName
    FROM Employees;

    Result:

    Employees
    ----------------------------
    Robert Finn Hill
    Bruce M. Wills
    Maria Andrew Brown
    Ashley Miller

    SQL Server:

    SELECT first_name + ISNULL(middle_name,'') + last_name As EmpName
    FROM Employees;

    SELECT first_name + COALESCE(middle_name,'') + last_name As EmpName
    FROM Employees;

    Hive:

    SELECT first_name + COALESCE(middle_name,'') + last_name As EmpName
    FROM Employees;


    Hope you find this article helpful.

    Hive Internal vs External Tables

    This article offers summary of the situations in which 
    you would need to create internal (managed) tables and external tables in Apache Hive.


    Create "External" tables when:

    • the data is being used outside the Hive. The data files are read and interpreted by an existing program that does not lock the files, for instance.

    • data needs to stay in the underlying position even after a DROP TABLE. In other words, the data file always stays on the HDFS server even if you delete an external table. This also means that Metadata is maintained on the master node, and deleting an external table from HIVE only deletes the metadata not the data/file.

    • you choose a custom place to be used, use external tables.

    • Hive doesn't own the data.

    • you are not creating a table based on an existing table (AS SELECT), use external tables.

    • you are okay with the fact that External table files are accessible to anyone who has access to HDFS. Security needs to be handled at the HDFS folder level.


    Create "Internal" tables when:

    • the data is temporary.

    • you want Hive to completely manage the lifecycle of the table and data.

    • you want the data and metadata to be stored inside Hive's warehouse.

    • You are okay with the fact that table deletion would also erase the master-node and HDFS metadata and actual data, respectively.

    • you want the security of the data to be controlled solely via HIVE. 

    Conclusion:

    In "Internal" tables, the table is created first and data is loaded later.

    In "External" tables, the data is already present in HDFS and the table is created on top of it.


    Big Data: Apache Hive & Impala Data Types Quick Reference

    This article offers an overview of the various data types that are available both in Apache Hive & Impala. 


    TINYINT - 1 byte 
    Range: -128 to 127

    SMALLINT - 2 bytes 
    Range: -32,768 to 32,767

    INT - 4-bytes
    Range: -2,147,483,648 to 2,147,483,647

    BigInt - 8 bytes value
    Range: -9223372036854775808 .. 9223372036854775807.

    FLOAT  - 4 bytes
    single precision floating point number

    DOUBLE - 8-byte
    double precision floating point number

    DECIMAL 
    Hive 0.13.0 introduced user definable precision and scale

    STRING 
    The hard limit on the size of a STRING and the total size of a row is 2 GB.
    The limit is 1 GB on STRING when writing to Parquet files.

    TIMESTAMP

    Timestamps were introduced in Hive 0.8.0. It supports traditional UNIX timestamp with the optional nanosecond precision.

    The supported Timestamps format is yyyy-mm-dd hh:mm:ss[.f…].

    Complex types:
    Complex types (also referred to as nested types) in Hive let you represent multiple data values within a single row/column position. Impala supports the complex types ARRAY, MAP, and STRUCT in Impala 2.3 and higher. 

    Arrays: Array<data_type>
         Collection of Similar Data
    Maps: Map<primitive_type, data_type>
         Key Value Combination
    Structs: Struct<col_name : data_type [Comment col_comment], …>
        Collection of Different Data


    TOP, LIMIT, ROWNUM vs DENSE_RANK

    What would you do if you were asked to identify top-ten products based on their prices?

    In SQL Server, using a TOP clause with a specified number of records with descending order of price?

    In MySQL and Impala, using a LIMIT clause with a specified number of records with descending order of price?

    Basically, TOP (in SQL Server), LIMIT (in MySQL and Impala), or ROWNUM (in Oracle SQL*Plus) keywords are used for pagination or page-results or limit the number of rows and is useful when applied on large tables. They will not help in identifying the rankings directly unless some workarounds. 

    Let's create some sample data and do some exercises to understand the scenario.

    The following statement will create a "Products" table:

    CREATE TABLE Products
    (
    ProductName STRING,
    Price DECIMAL(7,2)
    );


    INSERT INTO Products (ProductName, Price) VALUES
    ('Delights breads',25),
    ('Galaxy Chocolates',20),
    ('Kitkat Chocolates',22),
    ('Rainbow Chocolates',19),
    ('Americana Chocobread',26),
    ('Palm Milky Chocobars',28),
    ('Bounty chocolates',26),
    (Sparkles chocos',23),
    ('Smiley Cocos',21),
    ('DelightPlus chocos',22),
    ('Softy chocobar',18),
    ('Minis chocos',8)


    Now we have "Products" table with data.


    Let's query against the table to retrieve "Products" data based on the descending order of "Price" 

    SELECT ProductName, Price FROM Products
    ORDER BY Price DESC;


    Now, let us retrieve the top ten product information based on the highest price using LIMIT clause.

    SELECT ProductName, Price FROM Products
    ORDER BY Price DESC
    LIMIT 10;


    This returned ten rows however by looking at the data we can say it is not giving the information what we are looking for. i.e. the top-ten product information. There are some products that have the same price hence it will be considered only Top-8 products.

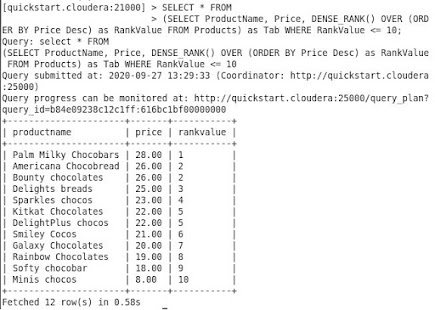
    In this scenario, we need to use DENSE_RANK to fetch the ranking of the products based on their price.

    SELECT * FROM (
    SELECT ProductName, Price, DENSE_RANK() OVER (ORDER BY Price DESC)
    AS RankValue FROM Products)
    AS Tab
    WHERE RankValue <= 10;


    Finally, we have successfully retrieved top-ten product information.


    Hope you find this article helpful.


    Big Data & SQL

    Hi Everybody, Please do visit my new blog that has much more information about Big Data and SQL. The site covers big data and almost all the...